How to Transfer Calls in DialNext: Step-by-Step Guide
During a customer call, an agent may need assistance from another team member to resolve a query or provide additional support. DialNext allows agents to transfer calls in DialNext using the Transfer option on the active call screen, helping customers connect with the appropriate teammate without interrupting the ongoing conversation.
This guide explains how to transfer an active call in DialNext, from opening the Transfer panel and reviewing teammate details to checking availability, selecting the right teammate, and troubleshooting common call transfer issues.
For more information about managing incoming calls efficiently, explore our guide on Call Queue Management.
How to Transfer Calls in DialNext
Before you begin, log in to your DialNext account.
Step 1: Open the Dialer
From the dashboard, select Dialer in the left navigation menu.
Once the Dialer opens, start a new call or receive an incoming call. The Transfer option becomes available on the active call screen.
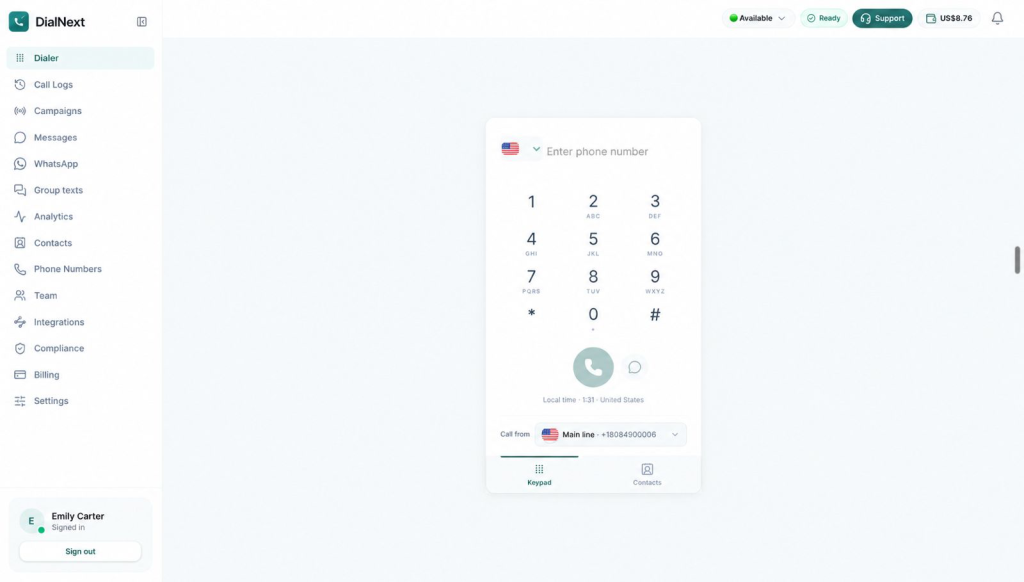
The Dialer dashboard provides access to the calling interface, phone keypad, and other calling features.
Step 2: Find the Call Transfer Option in DialNext
After connecting a call, locate the calling controls on the active call screen.
You will find the following options:
- Mute
- Hold
- Transfer
- Audio
- Notes
- End Call
To transfer calls in DialNext, select Transfer to open the teammate selection panel.
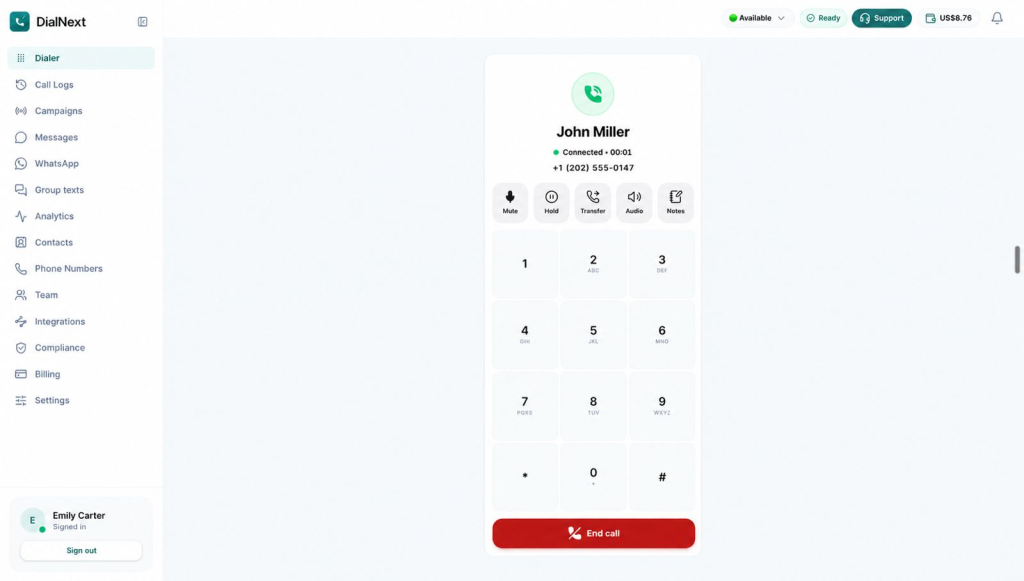
The active call screen displays the available calling controls, including the Transfer option, which allows agents to initiate a call transfer.
Step 3: Open the Teammate Selection List
After selecting Transfer, the Transfer To panel appears.
Open the Select teammate dropdown to view the teammates listed in your DialNext workspace, along with their extensions and availability statuses.
Review these details before selecting the teammate you want to transfer the call to.
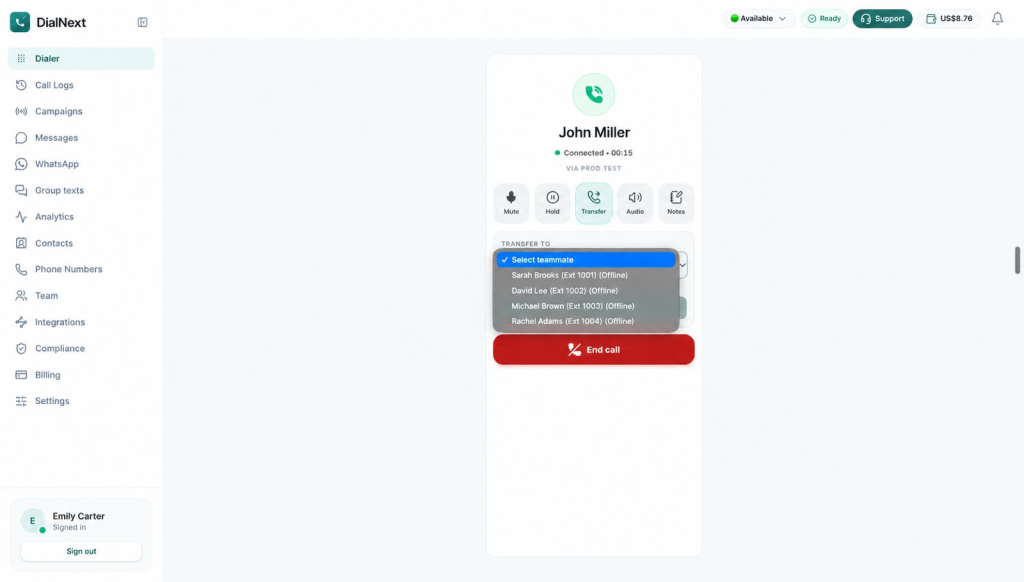
The Select teammate dropdown displays the available teammates in the workspace, along with their assigned extensions and availability statuses.
Step 4: Check Teammate Availability
Before selecting a teammate, review the availability status displayed in the dropdown.
The list displays teammate names, extensions, and availability statuses, such as Offline. Check these details before proceeding with the transfer.
If your preferred teammate appears as Offline, ask your workspace administrator whether they can receive transferred calls. When no suitable teammate is available, contact your workspace administrator for assistance.
Step 5: Select a Teammate
Once you identify the appropriate teammate, select their name from the Select teammate dropdown.
After making your selection, review the teammate’s details in the Transfer To panel to confirm that you have selected the correct person before proceeding.
Step 6: Select Transfer Call
Check whether the Transfer Call button is enabled. When it is, select Transfer Call to initiate the transfer.
If the button remains disabled, review the selected teammate and their availability status. Should the issue persist, contact your DialNext administrator or support team for assistance.
Understanding the Call Transfer Process in DialNext
The Transfer To panel allows you to select a teammate for transferring an active call. It displays teammate details and availability statuses to help you review your selection before proceeding.
The following table explains the main elements of the call transfer interface:
| Interface Element | Purpose |
|---|---|
| Transfer | Opens the call transfer panel. |
| Select teammate | Displays the list of teammates in your workspace. |
| Teammate name | Identifies the teammate selected for the transfer. |
| Extension | Displays the teammate’s assigned extension. |
| Availability status | Shows the teammate’s displayed availability status. |
| Transfer Call | Allows you to proceed with the transfer when the button is enabled. |
Common Issues When You Transfer Calls in DialNext
You may occasionally encounter issues while transferring an active call in DialNext. The following troubleshooting steps can help you identify possible causes and determine what to do next.
1. No Teammates Available for Transfer
If DialNext displays a message such as “No teammates available for transfer right now,” review the teammate list and check the displayed availability statuses.
If no suitable teammate is available, contact your workspace administrator for assistance.
2. Transfer Call Button Is Disabled
If the Transfer Call button is disabled, check whether you have selected a teammate from the dropdown.
Also, review the selected teammate’s availability status. If the button remains disabled, contact your DialNext administrator or support team for assistance.
3. The Teammate Is Not Listed
If a particular teammate does not appear in the dropdown, first verify that you are using the correct DialNext workspace.
Next, ask your workspace administrator whether they added the teammate to the workspace. If the teammate still does not appear, contact your administrator for assistance.
4. The Call Transfer Does Not Proceed
If you have selected a teammate but cannot proceed with the transfer, check your internet connection and confirm that the active call is still connected.
If the issue persists, contact your DialNext administrator or support team for further assistance.
For more information about managing incoming calls, read our guide on Call Routing System: What Is It and How Does It Work?.
Best Practices for Transferring Business Calls
A well-managed call transfer helps customers reach the right team member without unnecessary delays. Follow these best practices to make the transfer process smoother:
- Check teammate availability: Review the selected teammate’s displayed availability status before initiating a transfer.
- Choose the right teammate: Direct the call to someone with the relevant knowledge and experience to address the customer’s query.
- Avoid unnecessary transfers: Understand the customer’s concern before deciding whether another team member needs to handle the call.
- Keep the customer informed: Briefly explain that you are connecting them with another team member so they know what to expect.
- Follow up when needed: If the transfer cannot be completed, explain the available next steps and ensure the customer is not left without assistance.
A consistent post-call process also helps teams manage customer interactions more effectively. Learn how to organize follow-up activities in our guide to building a better post-call workflow.
Frequently Asked Questions About Call Transfers in DialNext
1. Where can I find the Transfer option in DialNext?
You can find the Transfer option on the active call screen in the Dialer. It appears alongside other calling controls, including Mute, Hold, Audio, and Notes.
2. How Do You Transfer Calls in DialNext?
To transfer an active call, select Transfer on the active call screen. Choose a teammate from the dropdown and select Transfer Call when the button is enabled.
3. Why does DialNext show that no teammates are available for transfer?
This message may appear when no suitable teammates are available for transfer. Check the displayed availability statuses. If no appropriate teammate is available, contact your workspace administrator.
4. Can I transfer a call to an offline teammate?
The teammate selection list displays availability statuses, including Offline. Contact your workspace administrator to confirm whether an offline teammate can receive transferred calls.
5. What should I do if the Transfer Call button is disabled?
Check whether you have selected a teammate from the dropdown and review their displayed availability status. If the Transfer Call button remains disabled, contact your DialNext administrator or support team for assistance.
Final Thoughts
Transferring calls to the appropriate teammate helps businesses handle customer queries more efficiently. With DialNext, agents can access the Transfer option during an active call, review teammate details and availability statuses, and select the appropriate person.
Before proceeding with a transfer, review the selected teammate’s details and availability status. Maintaining good call quality also helps ensure clear conversations. Learn more in our guide on how to improve VoIP call quality.
Get Started with DialNext
Looking for a reliable way to manage business calls and customer conversations? DialNext helps your team streamline business communication and connect customers with the right teammates.
Ready to simplify your business calling experience?
Sign up for DialNext today and explore its business calling features.
Have questions or need help getting started? Email our team at [support@dialnext.io] to learn more about DialNext.
External Resources
- Transfer a call in Microsoft Teams – Learn how to transfer calls using Microsoft Teams.
- Cisco Call Transfer Documentation – Explore Cisco’s technical documentation on call transfer functionality.