How to Organize and Track Calls Using Call Tags in DialNext
Call tags help your team organize customer conversations by assigning meaningful labels to individual calls. With DialNext, you can create custom tags, choose colours, and apply multiple tags directly from the call details in Call Logs.
Additionally, you can add notes to provide more context about each interaction. As a result, your team can understand previous conversations more easily and keep important customer information organized.
For example, you can use tags to identify follow-up opportunities, categorize customer interactions, and highlight important conversations. This way, your team can maintain clearer call records and manage customer interactions more efficiently.
Before You Begin
Before adding call tags in DialNext, make sure you have the following:
- First, ensure that you have access to your DialNext account.
- Next, make sure you can access the Call Logs section.
- Finally, identify the call you want to organize from your call history.
Once these requirements are met, you can start organizing your call records.
How to Add Tags to a Call in DialNext
Follow the steps below to apply existing tags, create custom tags, and add notes to individual calls.
Step 1: Open Call Logs
First, log in to your DialNext account.
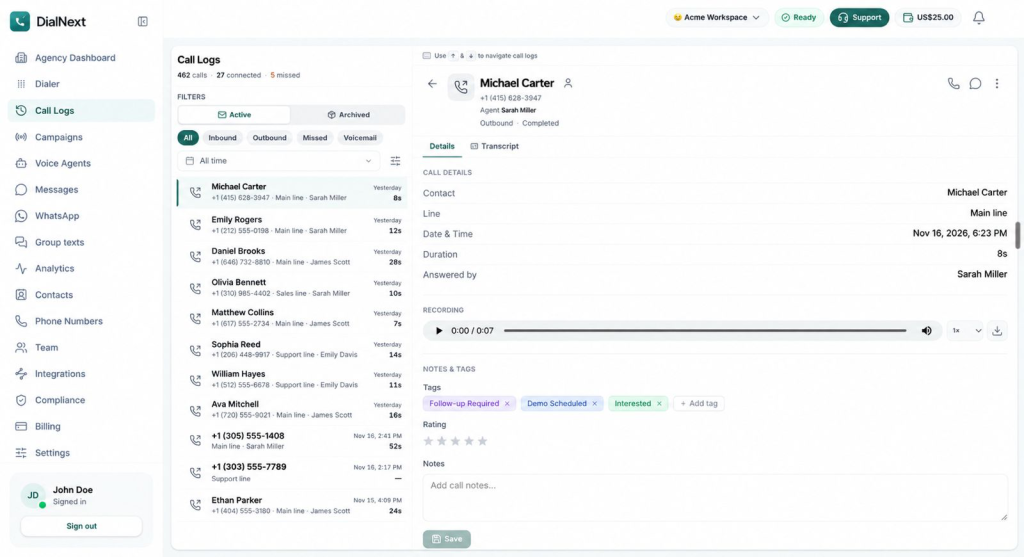
Next, navigate to Call Logs from the left sidebar. Here, you can browse your available call records.
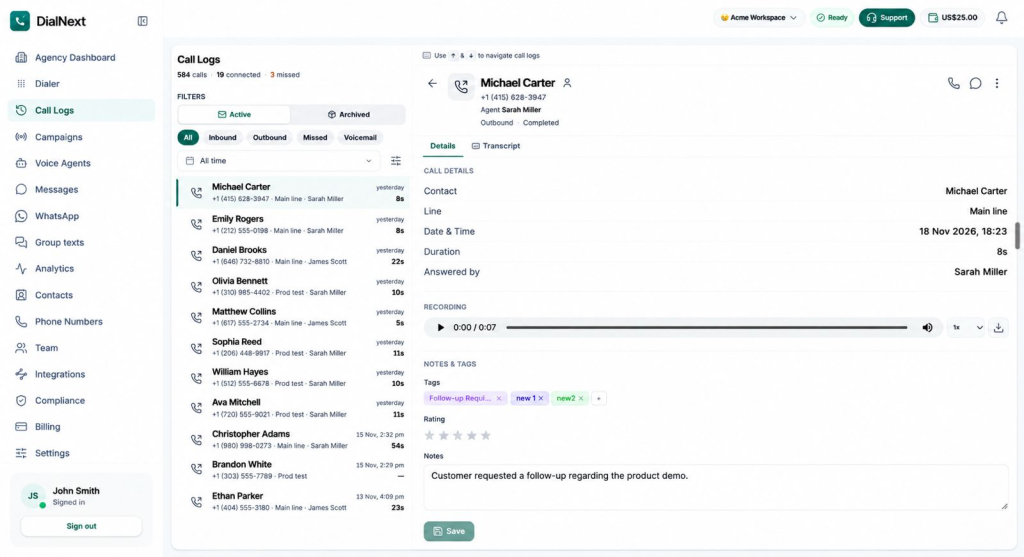
Then, select the call you want to organize. Once you select a call, its details will appear on the right side of the screen.
Step 2: Find the Notes & Tags Section
After opening a call, navigate to its Details tab.
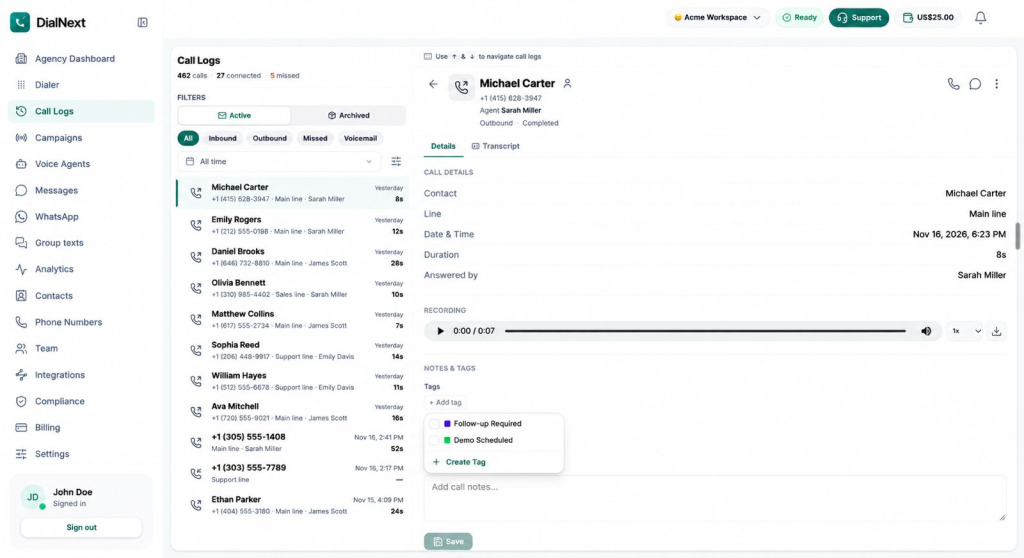
Next, scroll down to the Notes & Tags section. Under the Tags heading, click + Add tag.
Once you click this option, a dropdown will appear with the existing tags available in your account. From here, you can either select an existing tag or create a new one.
Step 3: Select an Existing Tag
If you already have suitable tags, you can apply them directly to the selected call.
To do this, follow these steps:
- First, click + Add tag.
- Next, review the available tags in the dropdown.
- Then, select the checkbox next to the tag you want to apply.
- Additionally, select other tags using their respective checkboxes if required.
Once selected, each tag will appear as a separate label under the Tags section. Therefore, you can assign multiple tags to a single call and categorize the interaction more clearly.
Step 4: Create a Custom Tag
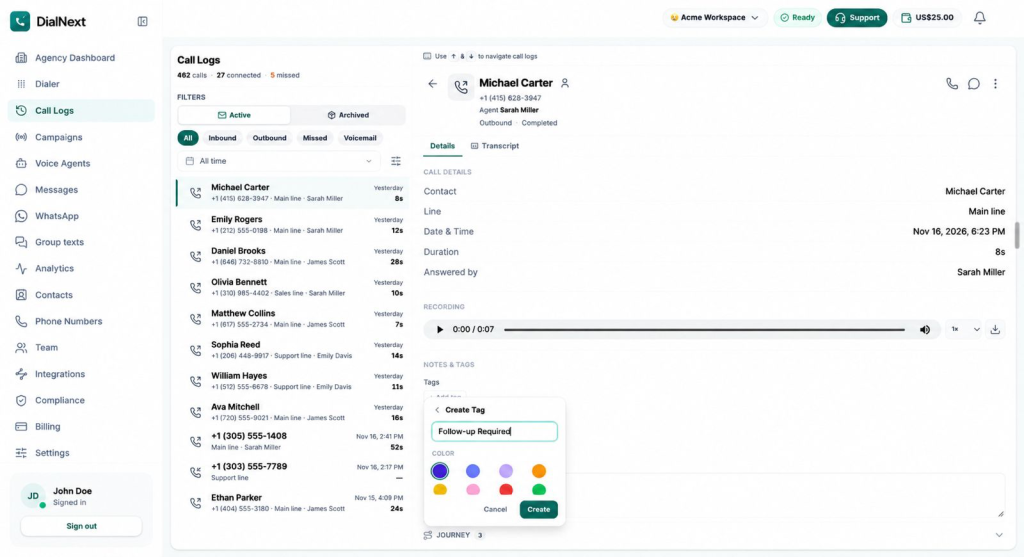
If the required tag is not available in the dropdown, you can create a custom one directly.
To create a new tag, follow these steps:
- First, click + Add tag.
- Next, select Create Tag from the dropdown.
- Then, enter your preferred name in the Enter tag name field.
- After entering the name, choose a colour from the available colour options.
- Finally, click Create to create your tag.
Once created, your new tag will appear in the available tags list. You can then select its checkbox to apply it to the current call.
For example, you can create tags such as:
- Follow-up Required
- Demo Scheduled
- Interested Customer
- Callback Needed
Furthermore, choose clear and meaningful names so your team can easily understand what each tag represents.
Step 5: Add Call Notes
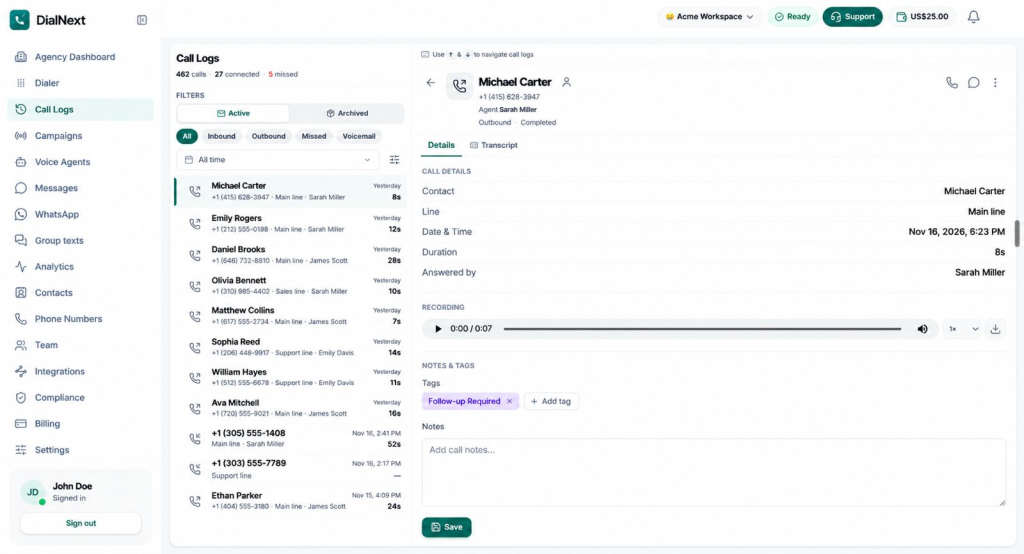
Along with tags, you can also add notes to provide additional context about a customer interaction.
To add a note, follow these steps:
- First, navigate to the Notes field under Notes & Tags.
- Next, enter the relevant information about the call.
- Finally, review the note to make sure it is clear and useful for your team.
For example, you can enter:
“Customer requested a follow-up regarding the product demo.”
Similarly, you can mention important discussion points or follow-up requirements. This way, your team can refer to the notes when handling future customer interactions.
Additionally, you can learn more about reviewing call recordings and transcripts in HubSpot’s guide.
Step 6: Save Your Changes
After selecting the required tags and entering your call notes, you need to save your changes.
Before saving, review the selected tags and check the information entered in the Notes field.
Once everything is ready, click Save in the Notes & Tags section.
After saving, your tags and notes will remain associated with the call record. Additionally, you can reopen the call details to view the saved information.
Best Practices for Using Call Tags
To keep your call records organized, follow these simple practices:
- Use descriptive names: Choose clear tag names such as Follow-up Required, Demo Scheduled, or Interested Customer. This way, every team member can understand the purpose of each tag.
- Maintain consistent naming: Use a common naming convention across your team. As a result, everyone can categorize customer interactions more consistently.
- Use colours meaningfully: Choose different colours to distinguish between tags. Additionally, this makes individual tags easier to identify visually.
- Apply relevant tags: Select tags that accurately represent the customer interaction. However, avoid adding unrelated labels to a call.
- Add useful notes: Along with tags, include important context about the conversation. Consequently, your team can better understand previous interactions.
By following these practices, your team can maintain clearer call records and organize customer conversations more effectively.
Frequently Asked Questions
1. Where can I find call tags in DialNext?
You can find call tags in the Notes & Tags section inside an individual call’s details. First, open Call Logs and select a call. Next, click + Add tag to view the available tags.
2. Can I create custom call tags in DialNext?
Yes. You can create custom tags directly from the tag dropdown. To do this, click + Add tag and select Create Tag. Then, enter a tag name, choose a colour, and click Create.
3. Can I assign multiple tags to a single call?
Yes. DialNext allows you to select multiple tags for an individual call. Simply select the checkboxes next to the required tags. Once selected, the tags will appear as separate labels under the Tags section.
4. Can I add notes along with call tags?
Yes. The Notes & Tags section also includes a Notes field. Additionally, you can enter relevant information about the interaction and save it along with your selected tags.
5. How do I save call tags and notes?
After selecting your tags and entering the relevant notes, click the Save button in the Notes & Tags section. Once saved, your changes will remain associated with the call record.
Organize Your Calling Workflow with DialNext
Keeping customer conversations organized helps your team maintain better context during follow-ups. With DialNext, you can create custom call tags, assign multiple labels, and add notes to individual call records.
So, start organizing your calls with DialNext today. Give your team better visibility into customer interactions and make every conversation easier to manage.